
GET Mobile (iOS/Android app) enrollment temporarily unavailable
Schedule Planner and Enrollment are temporarily unavailable in GET Mobile.
Please login to GET from the MyCalStateLA portal instead of using the mobile app for these features.
Instructions for how to use GET and College Scheduler can be found further down this page.
Welcome to GET!
This page is here to help prospective and current students quickly find important information at Cal State L.A. about GET (Golden Eagle Territory). Click the topics below to get started; Each grey "accordion" section has an arrow on the left. Click one of the accordion sections to view detailed information about the topic listed. Already know where to go? Login to GET
Note: This page is for current students. Faculty, Staff, and Student Alumni can visit their GET page.
New students start here (Applicants, CSU Fully Online, International, Study Abroad)
The GET Self-Service Student Center page allows applicants to track the progress of their admission application, update contact information, and view their To Do List.
GET asks for a User ID and password in order to sign in. These are based on your 4-digit PIN and your Campus Identification Number (CIN).
- The User ID for GET is your 9-digit CIN. Your CIN can be found on emails from the Admissions Office, or if available, your Golden Eagle Card (student ID card).
- The password for GET begins with the letters GET followed by the 4-digit PIN you were assigned. For example if your PIN is 1234 your password is GET1234.
- Using the User ID and password described above, you can Login to GET.
Essential Links
GETmobile App
To improve your access to GET, download the free Cal State LA GETmobile app. You can quickly access class information, check grades, view detailed fee information, pay fees and much more!
Here's some of the GET features that GETmobile lets you access:
- View current and past class schedules with class details
- View detailed fee information and pay fees
- View holds and notices from the University
- View the current term's final exam schedules
- View grades
- View the To Do list
- View the University Course Catalog
- Complete the Student Course Evaluation
More features will be added over time; for up-do-date information on the latest version, go to the GETmobile app.
Campus Life
Campus Technology and computer resources
Dates & Deadlines
Please visit the University Scheduling Office for term Dates and Deadlines.
Learn about GET
Click the topics below to learn about GET, or simply Login to GET.Introducing GET
GET is a personalized web page with services and information tailored to you; it is available to Cal State LA applicants and continuing students.
Within GET you can see:
Personal Information
- Update your addresses, phone numbers and personal email address
- View your campus assigned email address
- View your Holds
- View your To Do List: This may contain a list of documents that you need to submit, such as tax forms needed for your Financial Aid application.
- View your demographic data
Admission
- Follow your admission application status through the process
- Accept your admission offer
Academics
- Search and view the course catalog
- Search the current schedule by: subject area, course, day/time, instructor, open/closed classes, and more
- View your online enrollment appointment
- Register online
- Add, Drop, and Swap classes
- View your class schedule
- View your grades and unofficial transcript
- View your Academic Requirements report
Finances
- View your Financial Aid status
- View your Financial Aid awards
- Accept or decline your Financial Aid awards
- View your account summary
How to sign into GET
- Click on the myCalStateLA link located at the top of the page.
- Sign into myCalStateLA.
- Under QuickLaunch, click on the GET icon.
Still unable to sign in? Contact the GET Help Line at (323) 343-7438 or (323) 343-6170. GET Help Line Hours M - Th: 8:00am-6:00pm, Fri 8:00am-5:00pm. After hours, please leave a message.
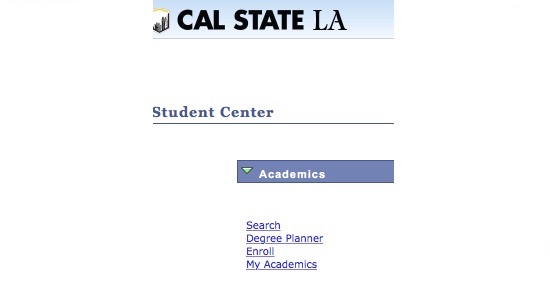
GET Student Center - Introduction
The Student Center displays important information like your class schedule and outstanding balance. Revise your personal information, search for classes, register, add/drop/swap classes, and control many aspects of your online student profile through the Student Center.
If you navigate off of the Student Center page, you can easily return: just click on go to at the top and the bottom of the page.
GET Student Center - "Personal Information"
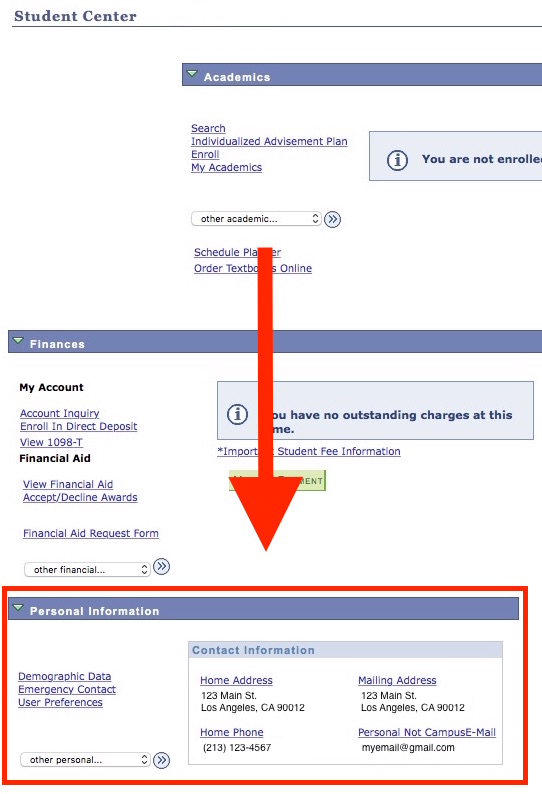
- Addresses: view your addresses by "type" e.g. home, mailing, and business.
To change your current address, locate the address to be changed and click on the appropriate address label, e.g. Mailing Address, Home Address. Update the information and click save. You can also enter an address change that will take place in the future - just enter the date when the change is effective and click save.
- E-mail Addresses: View your e-mail addresses by "type" e.g. home, on-campus, and other. You can add new or update existing e-mail addresses.
To change your current e-mail address, click the e-mail address link within Personal Information. Select the e-mail to be changed, enter the new address and click Save.
Important: Always check your Cal State LA E-mail address (located at the top of the page), since Cal State LA sends Official Notifications there.
- Emergency Contact: View the name, address, and phone numbers for your emergency contact. Add as many contacts as you wish.
- Demographic Information: View a summary of demographic data including date of birth, gender and CIN (Campus Identification Number).
- User Preferences help you navigate through the GET self service pages. The values include Institution, Academic Career, Term and Aid Year.
Institution cannot be changed. You can update Career, Term and Aid Year, and your entries will save you time by auto-filling other menus. Remember to update these values to reflect new terms and new Financial Aid Years.
GET Student Center - "Academics" - Class search & more
- The Academics section of Student Center allows you to:
- Access Schedule Planner to plan your schedule and add courses
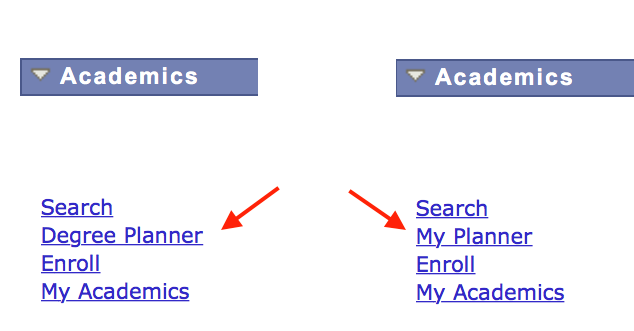
- Use Degree Planner or My Planner to plan your academic path to graduation.
- Check to see if you have any registration holds
- View your enrollment appointment
- View and print your class schedule
- Update your registration by:
- Adding Classes
- Dropping Classes
- Swapping between Classes
- Searching the Schedule of Classes
Click on Search for Classes at the top right hand side of the page for real-time information on course offerings.
If you need to look up a Course Number, the CLASS SEARCH CRITERIA drop-down menu gives the following options:
- contains: Enter a number to find a class that contains that value in the Course Number (e.g. 2 would yield any class with a 2: 1020, 2010, 2120, 4260)
- greater than or equal to: Enter a number to find a Course Number equal to or greater than that number (e.g. 2000 would yield 2000, 3340, 4260)
- is exactly: Enter the exact value of the Course Number (e.g. 2000). This is the default selection.
- less than or equal to: Enter a number to find a Course Number equal to or less than that number (e.g. 2000 would yield 2000, 1010, 1140)
- Holds
The Holds section shows and explains any restrictions you may have.
- Click details to view the Holds page
- Click the link for any Hold to see more information.
- View detailed information about the specific hold and how to remove the hold. Example: you have a library fine and cannot use library services. Click on details to see what you must do to remove the hold and get library access.
- To Do Lists
Click on details to view the To Do List page, which contains links for each To Do item. If there are items to be resolved you will see instructions on how to do so.
Enroll/Register for Classes - Enrolling is a 6-step process
1-2. Resolve Holds and Plan your Degree
Registration & Enrollment
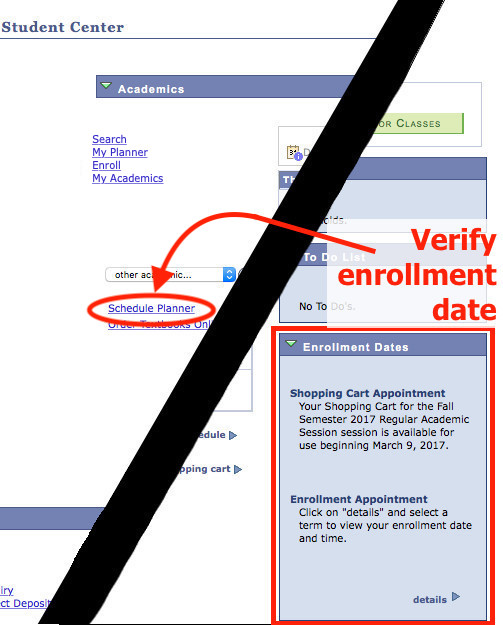
Class Enrollment begins with a scheduled Enrollment Appointment. Your appointment date and time is displayed in the Student Center. Please refer to the Scheduling Office webpage for registration start dates and deadlines.
Access GET from the MyCalStateLA Portal.
You will be assigned a specific day and time when you may begin enrolling. Enrollment Appointment times are assigned randomly throughout the day based on your academic level and units earned. The time assigned to you is fixed and not subject to change for any reason. Hint: In GET, use the change term button to select the correct term when looking for your Enrollment Appointment.
Enrollment Step 1: Resolve holds
Resolve any holds you see in your GET Student Center.
Enrollment Step 2: Plan your Degree for a timely Graduation
Cal State LA offers two degree planning tools via GET to students in order to assist with an on-time completion of courses for Graduation.
To see which tool is available to help you plan your degree path:
| If you see Degree Planner visit the Degree Planner page. | If you see My Planner visit the My Planner page. |
- log into GET and access the GET Student Center.
- Under Academics, look to see what links you have listed.
3. Plan your Class Schedule ahead of time with Schedule Planner
Enrollment Step 3: Use Schedule Planner to plan your Schedule in advance
Plan your schedule ahead of time via your Enrollment Validation. Enrollment Validation is typically available to you a few weeks prior to your actual Enrollment Appointment.
Think of Enrollment Validation as creating a "rough draft" of your schedule. You can get most of the work finished ahead of time. Students who plan schedules ahead of time encounter fewer last-minute problems and are more likely to get the classes and times they prefer.
Use Enrollment Validation to:
- Plan your schedule via Schedule Planner ahead of time
- Verify the courses are available for enrollment
- Identify additional steps required before enrollment (1class permits, consent, prerequisite, time conflict, etc.)
- Help avoid last minute problems getting courses. You will need to check your schedule regularly because courses may fill up with students who have earlier appointment times, so your schedule is not guaranteed until you actually complete enrollment.
-- Open Schedule Planner
To access Schedule Planner:
- Navigate to the Student Center within GET (see prior instructions if you don't know how to do this).
- Click on the Schedule Planner link.
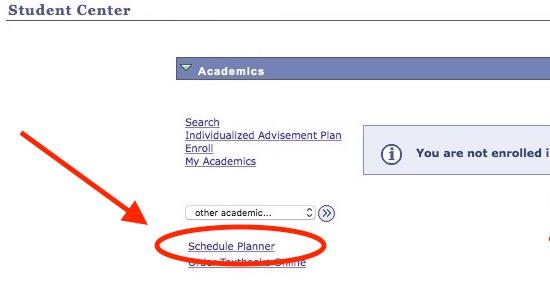
- After reading the instructions, click on the green CLICK HERE button. (Note: You may need to disable the pop-up blocker on your web browser, since Schedule Planner will start as a pop-up window.)
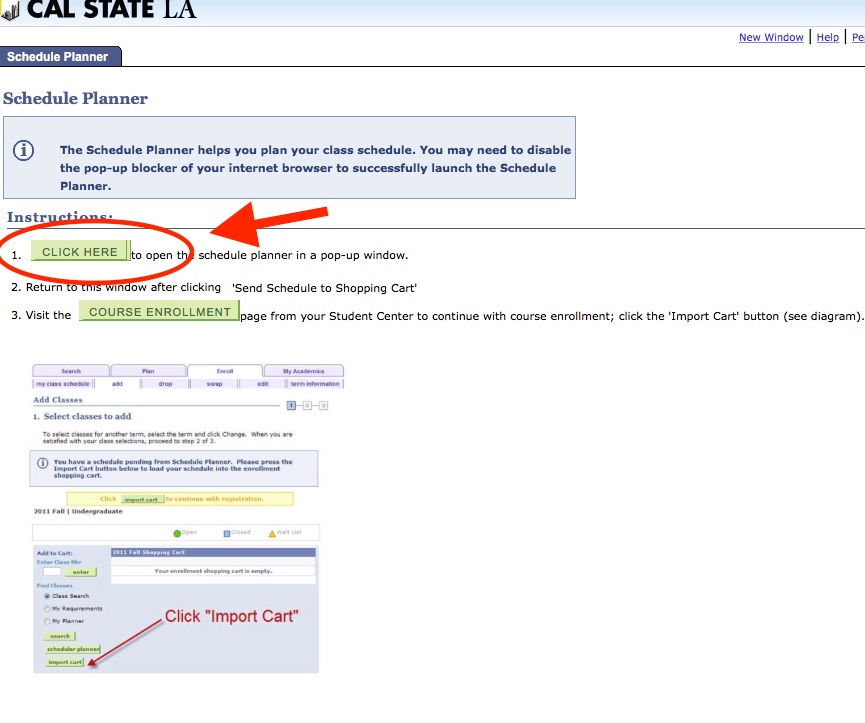
- Schedule Planner will open in a new window.
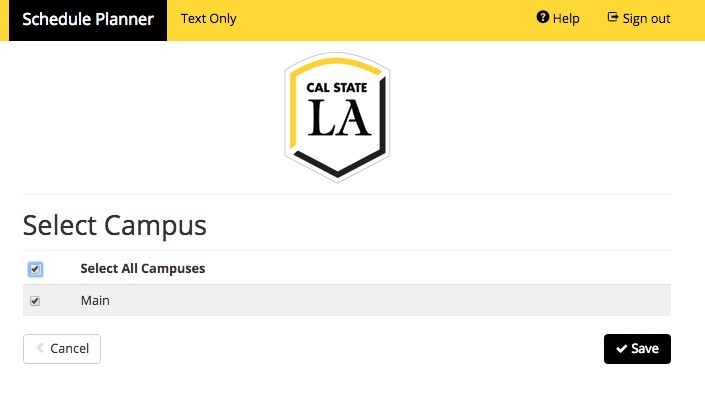
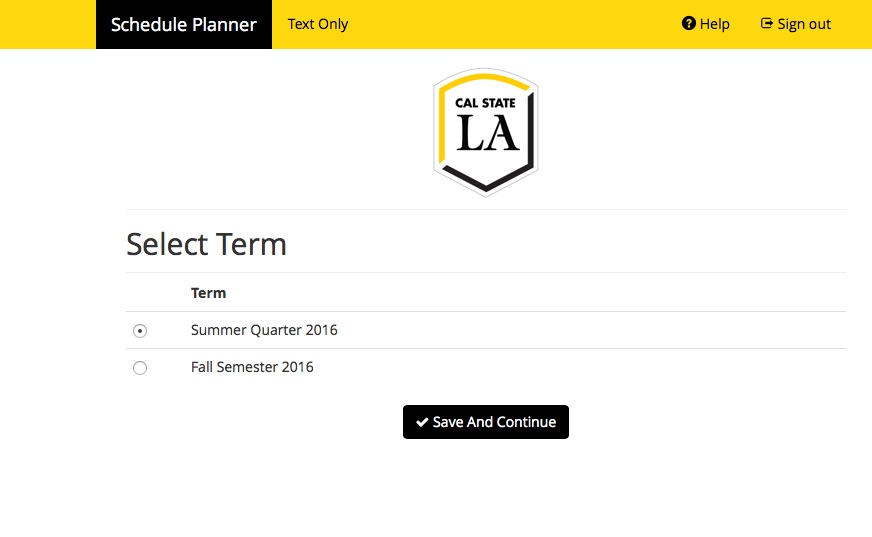
-- Select your campus & term
-- Choose the type(s) of classes
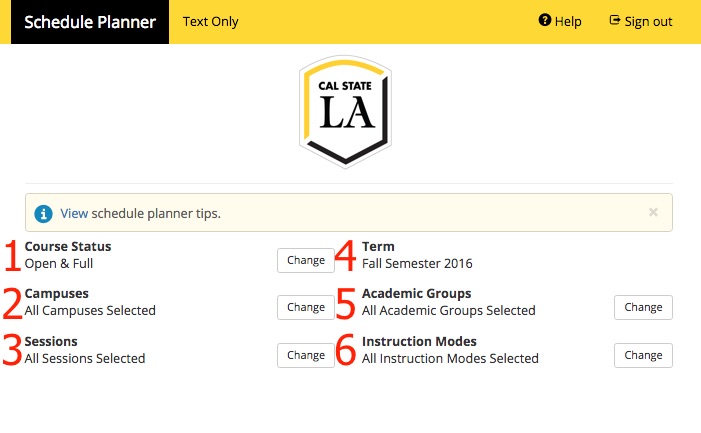
- Course Status: Click here to choose whether to include full and/or waitlisted classes in your search.
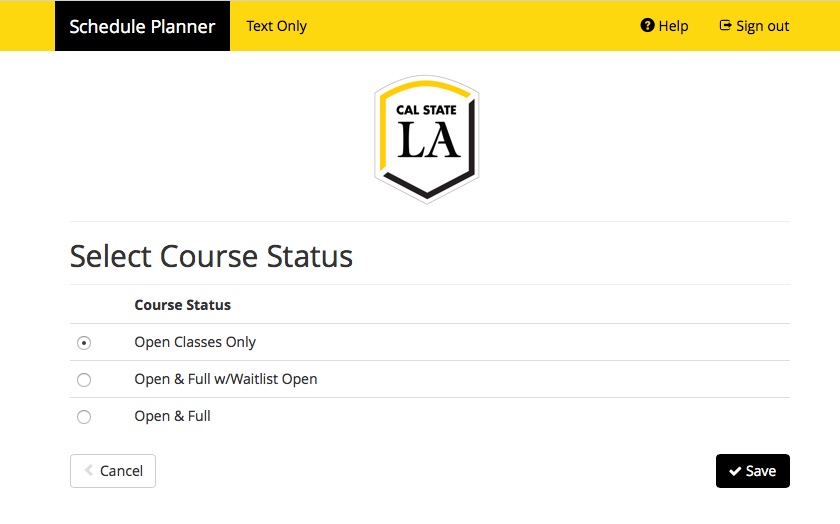
- Open Classes Only: Only choose classes that still have space
- Open & Full w/Waitlist Open: Choose open classes and classes that still have space on the waitlist
- Open & Full: Choose all classes, regardless of whether there is space available
- Campus: Normally leave this to "All Campuses Selected".
- Sessions: Normally leave this to "All Sessions Selected".
- Term: Make sure the correct term is listed here.
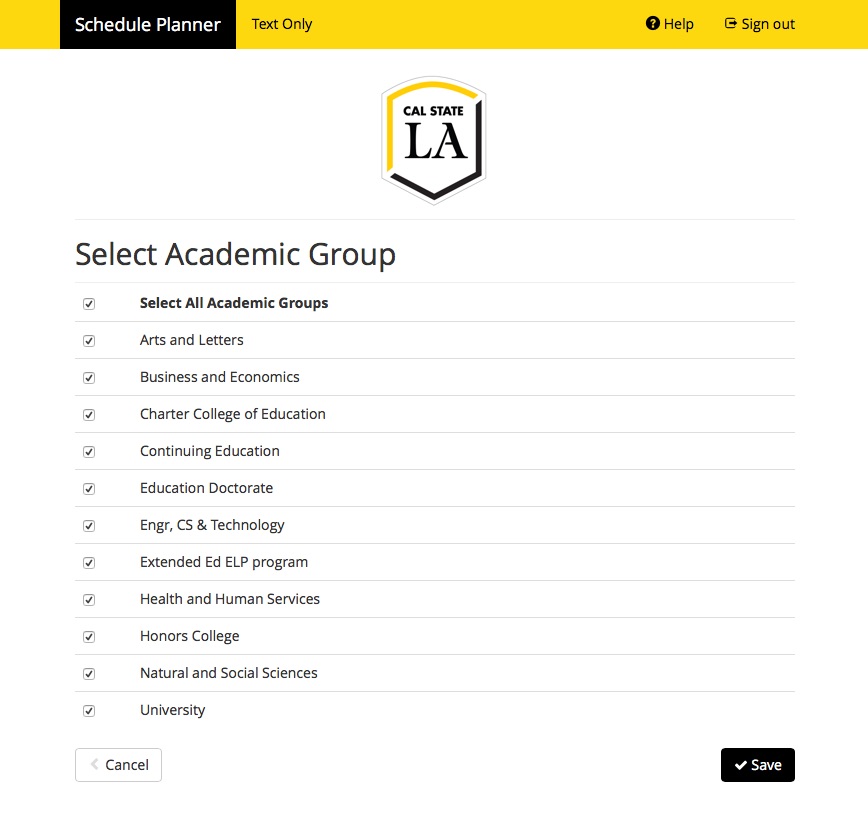
- Academic Groups: Click here to choose what colleges and Academic Groups you want to include in your class search. Use the checkboxes to the left of each Academic Group to select or deselect that group.
- Instruction Modes: Click here to choose between traditional classes, online classes, and hybrid classes.
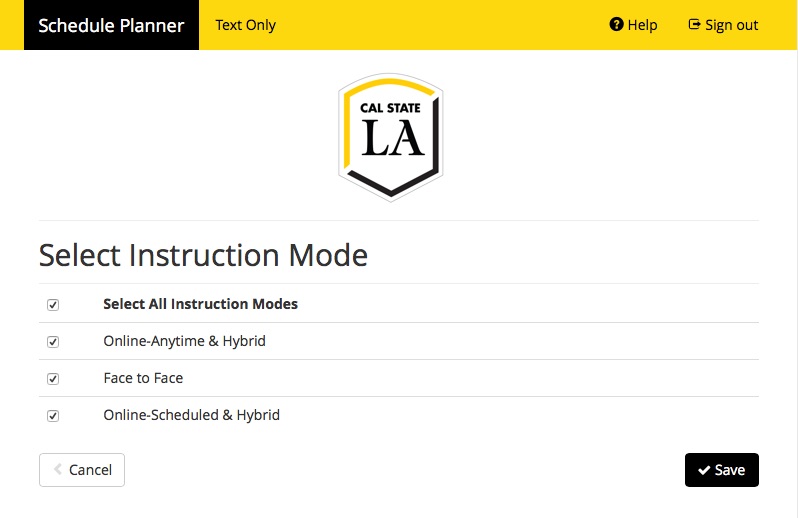
- Select All Instruction Modes: View all classes regardless of format
- Online-Anytime & Hybrid: Limit to online courses that do not have specific lecture times and hybrid courses
- Face to Face: Limit to non-online, traditional in-class courses
- Online-Scheduled & Hybrid: Limit to online courses that have specific scheduled meeting times and hybrid courses
-- Import Degree Planner courses to Schedule Planner
In some cases Schedule Planner will find courses that were added in Degree Planner. For more information on Degree Planner including which majors are available and who is eligible, visit the Degree Planner website.
You will see a blue box indicating that you have course(s) ready to import. Click the link inside the blue box to import the courses 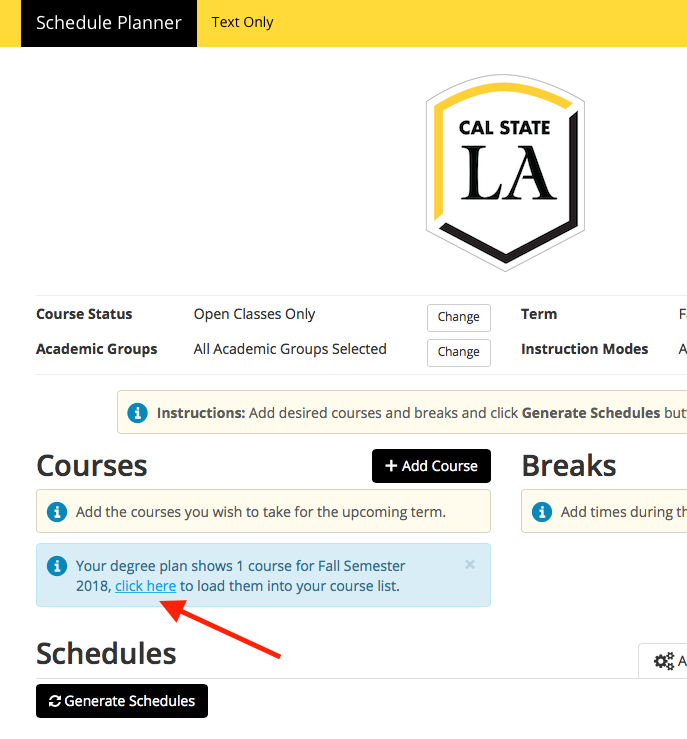
Your Degree Planner course(s) will now appear under Courses. 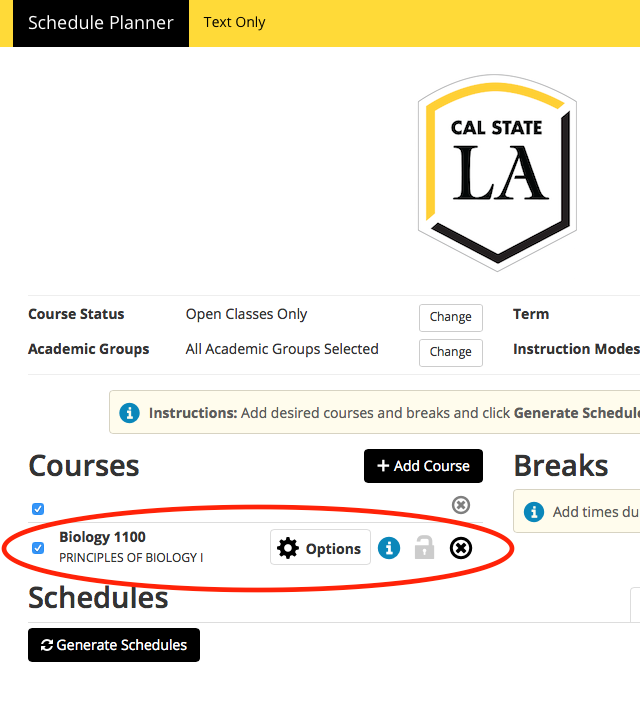
-- Add Courses to your schedule
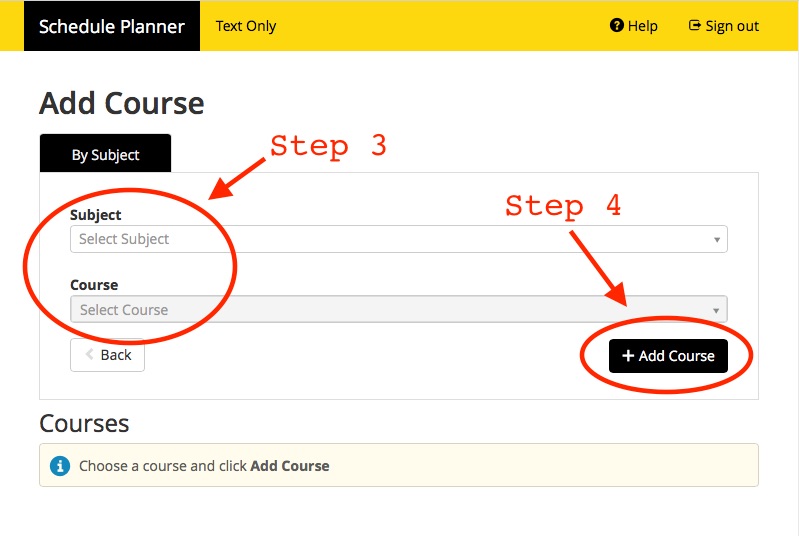
- Click the black Add Course button
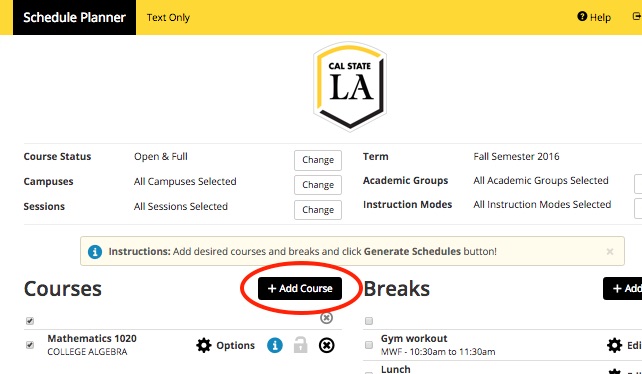
- You will see the Add Course screen.
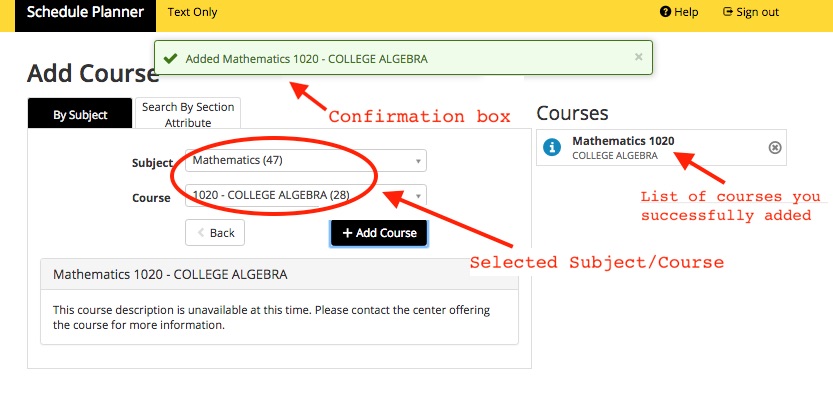
- From the drop-down box under By Subject, select the subject/department that contains the course you want to add. Then, from the drop-down box under Course, select the course you want to add to your schedule.
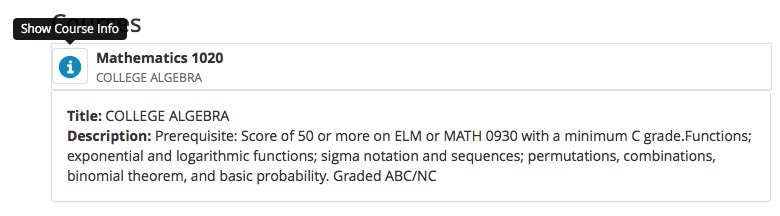
- Once you click the black Add Course button, a green box will appear at the top of the screen confirming you have successfully added the course to your schedule. You can also click the blue i circle next to the added courses to view details on that course, such as prerequisites and course content.
- You can also search by Section Attribute. This tab lets you select specific types of courses, like General Education (GE) requirements, CSU Fully Online, service learning (usually Child Development), or Technologically Mediated (e.g. some Accounting, Nursing).

- When you are done adding classes, click the Back button to return to the main screen.
-- Breaks and Class Padding - define when you are unavailable
- Click the black Add Break button.
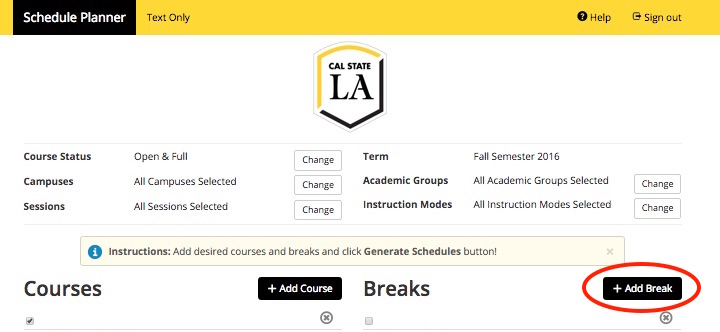
- You will see the Add New Break screen. Here you can give your break a name (e.g. lunch, workout, volunteering, etc) and specify the start/end times and day(s) you want the break in your schedule.
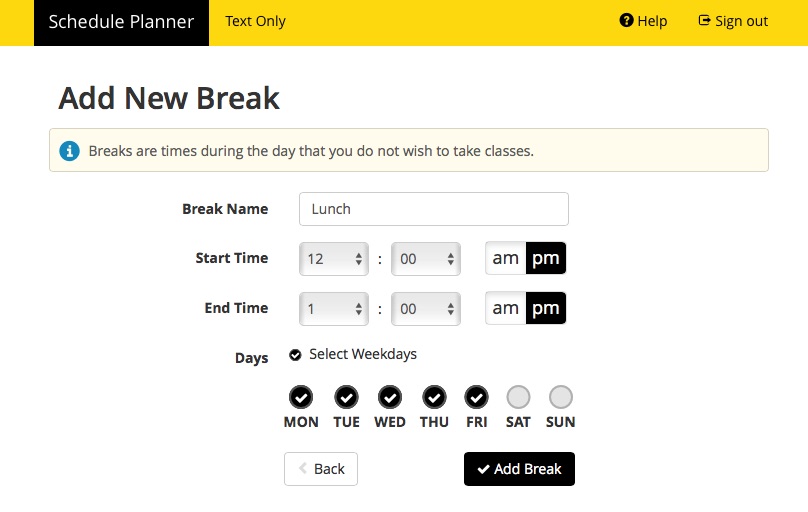
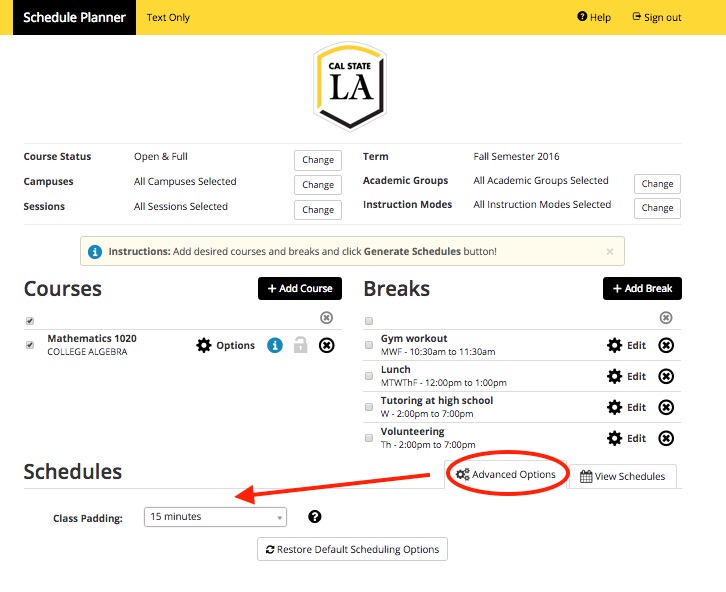
Pictured is the Break screen with a break filled out for lunch from 12-1pm on MTuWThF. - When you click the black Add Break button, you will be returned to the main screen, and the break(s) you have entered will be listed in the Breaks section.
- You can also add Class Padding, which adds minutes between classes to allow you time to travel. Access this on the main Schedule Planner page, under the Advanced Options tab.
-- Generate your schedule(s)
Once you add your courses plus optional breaks/padding, click the black Generate Schedules button to create your schedule. You will now see all the possible schedules you can have, given the courses and breaks/padding you entered. Tip: If you get too many possible schedules, consider adding more courses or breaks to lower the number of possibilities.
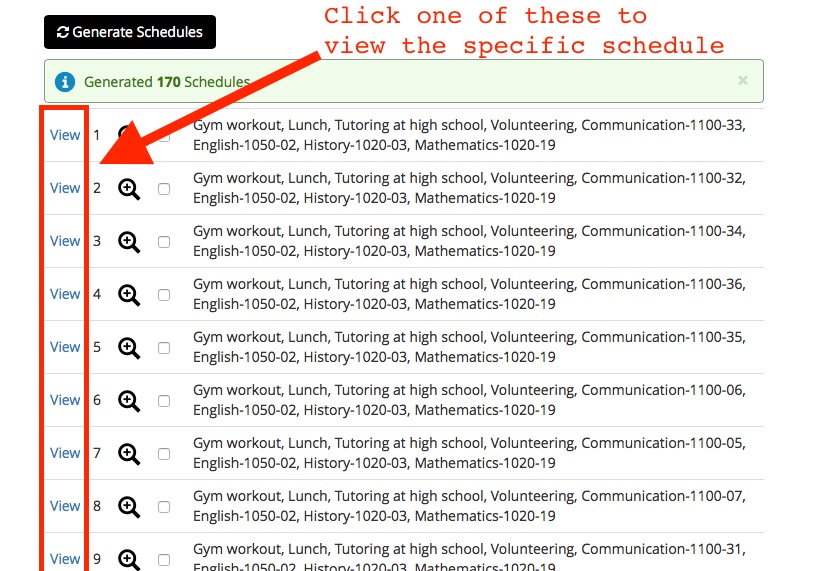
Click the View link next to one of the schedules to show you the schedule on a calendar. You can browse through the available schedules by clicking the forward and back arrows at the top right of the calendar.
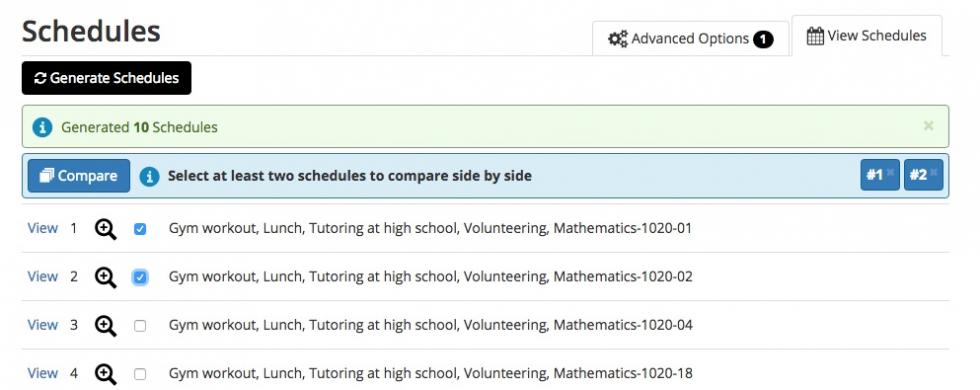
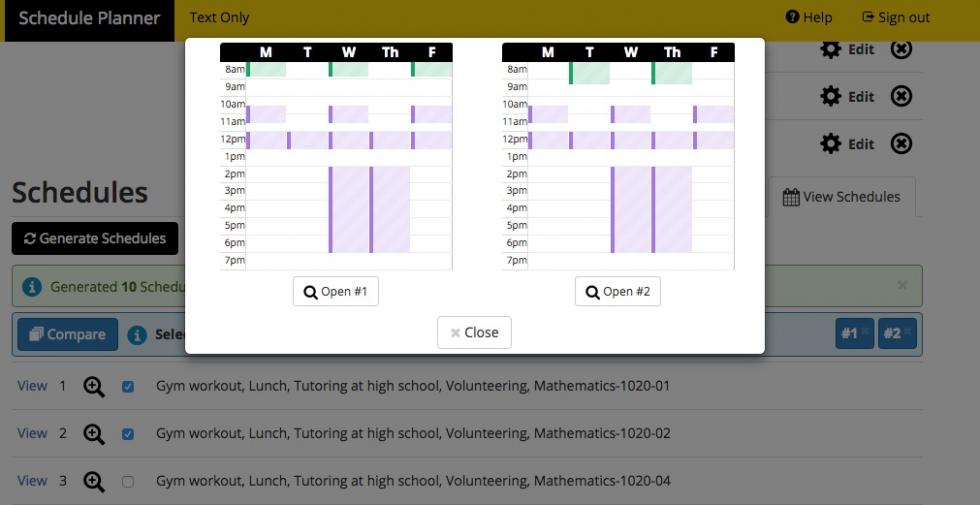
-- Compare more than one schedule
If you select 2 or more schedules, you can quickly compare them. A Compare button will appear, and if you click it you will see mini versions of the schedules you have selected.
-- View your schedule
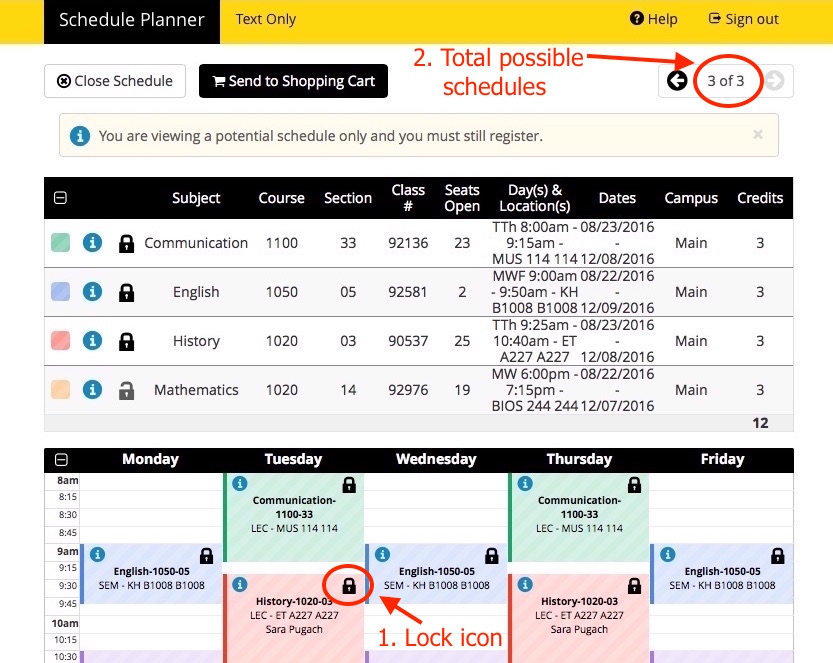
Clicking the lock icon (labeled 1) on a course will choose that course to be in your final schedule. This usually reduces the number of possible schedules offered to you. You will see the number of schedules at top right (labeled 2) go down, sometimes by a lot! Locking additional classes will again reduce the number of possible schedules.
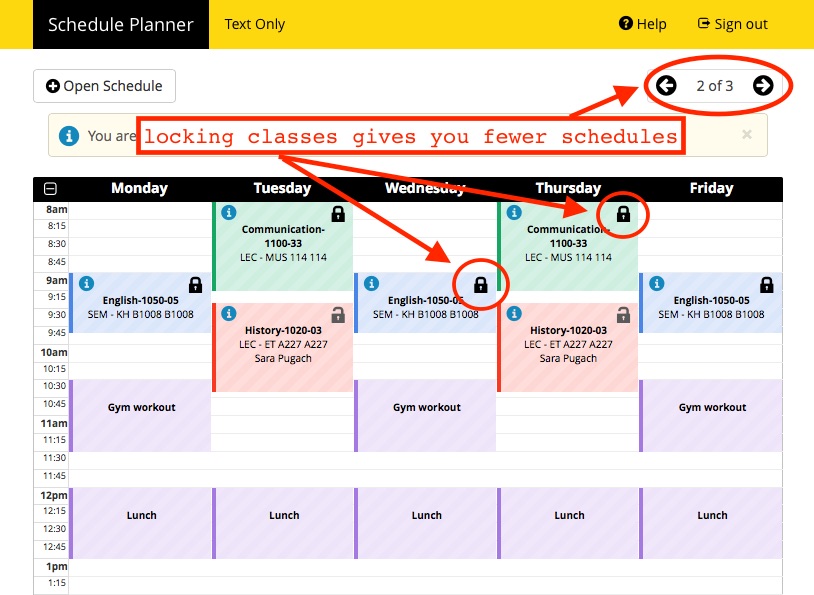
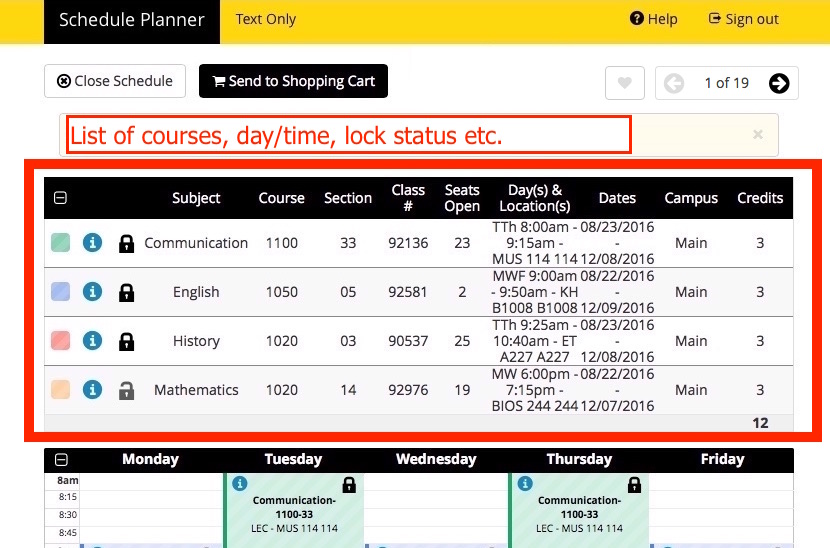
At the top, above the day/time calendar of your schedule, is a list of courses which includes their section number, days/locations, and whether you have locked them into your schedule.
-- Validate your Schedule
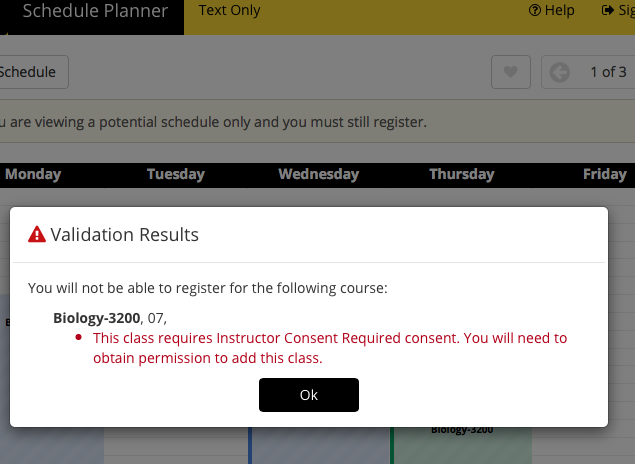
While you are viewing a potential schedule, you can Validate the schedule to see if there are potential issues that might prevent you from enrolling. For instance, you might need department consent to take a course, or you may not have completed the prerequisites needed to enroll in the course you're hoping to add.
- Click the Validate button to Validate your schedule.
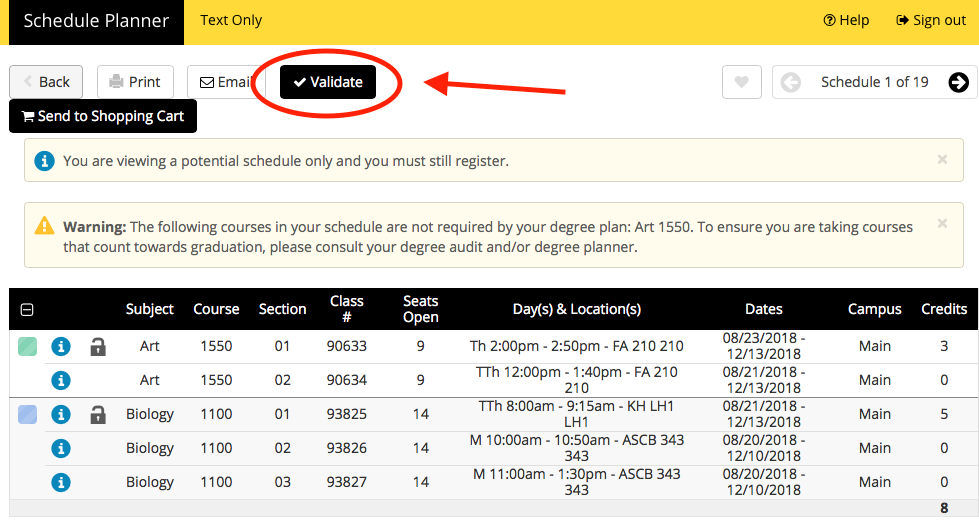
- You will see a dialog box appear with your Validate Schedule results.
- In this example, Validate Schedule did not find any potential issues
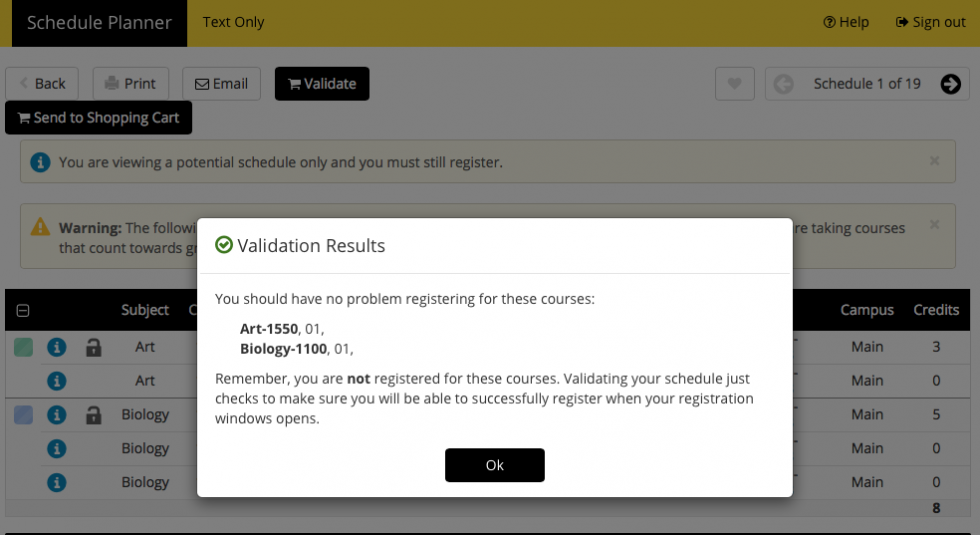
- In this example, Validate Schedule found a course that requires Instructor Consent. In this case, your next step would be to obtain that consent before adding the course
- In this example, Validate Schedule did not find any potential issues
-- Save a Favorite Schedule
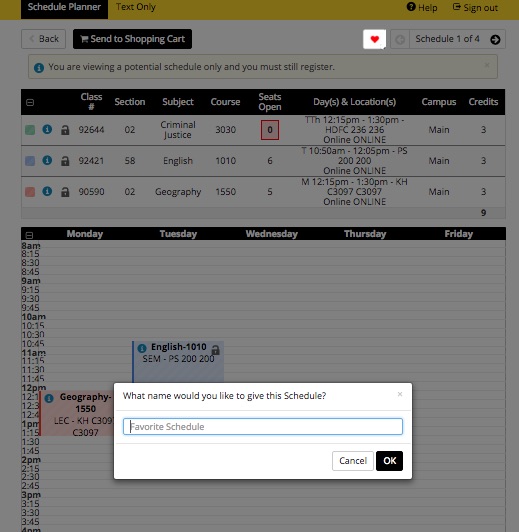
If you find a schedule that you like, you can save it as a Favorite Schedule by clicking on the heart icon at the top right. A window will pop up asking you to name your schedule. You will be able to return to this schedule from the main screen under your Favorites.
-- Revisit your schedule before your Enrollment Appointment date
It's possible that class sections you have selected may become unavailable; for example, students with earlier appointments may fill up available seats. It is important that you check back and Validate your schedule periodically to make sure that the sections you want are still available.
4-6. Clear the path and finish Enrollment
Enrollment Step 4: Pay any tuition and fees
Pay any tuition and fees not covered by your anticipated term financial aid at least three days prior to your Enrollment Appointment day and time. Financial Aid will send notifications including anticipated aid to students who met the priority application date. Additional information on deadlines for term tuition, fees and late fees can be found on the Cashier's Office webpage.
Enrollment Step 5: Obtain permissions for classes as needed
Certain classes may need instructor, department, or other consent for you to enroll. Be sure to contact the department and/or instructor to obtain permission well before your Enrollment Appointment.
Enrollment Step 6: Enroll in classes during your Enrollment Appointment day/time
Return to the Student Center when your Enrollment Appointment day and time arrive. Your appointment date and time will be listed in the Student Center.
Click on the Schedule Planner link. Review your schedule, confirm classes are still available and make any needed adjustments.
Hint: Refer to Enrollment Step 3 for more on how to use Schedule Planner.
Once you have your Class Schedule selected and chosen, click the Validate button to validate your schedule. Once that has been successfully completed click the Send to Shopping Cart button.
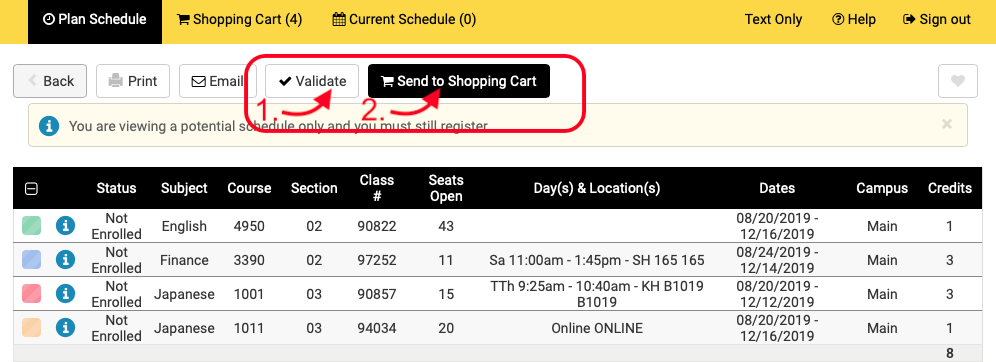
Once you are in the Shopping Cart you can again Validate your schedule. After Validation, click the Register button.
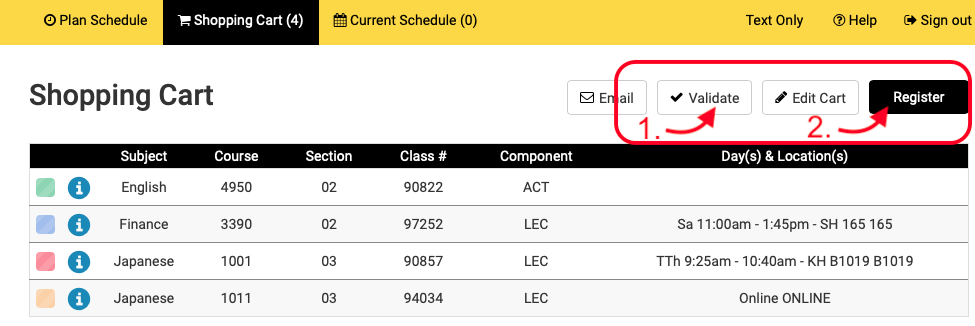
You will be prompted to confirm you want to register. Click Continue and complete the registration process.

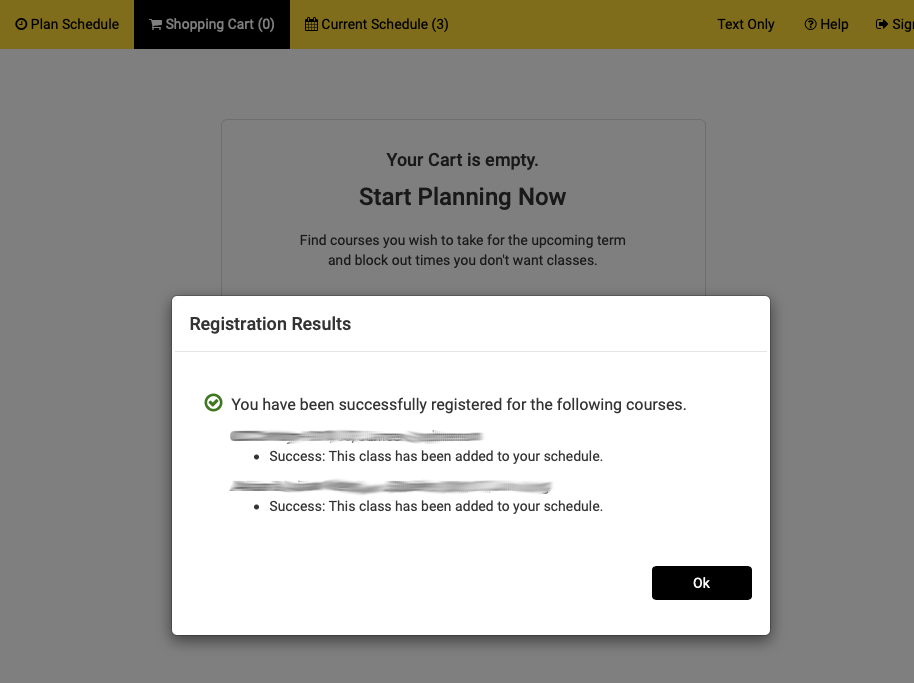
You will receive a confirmation that you enrolled.
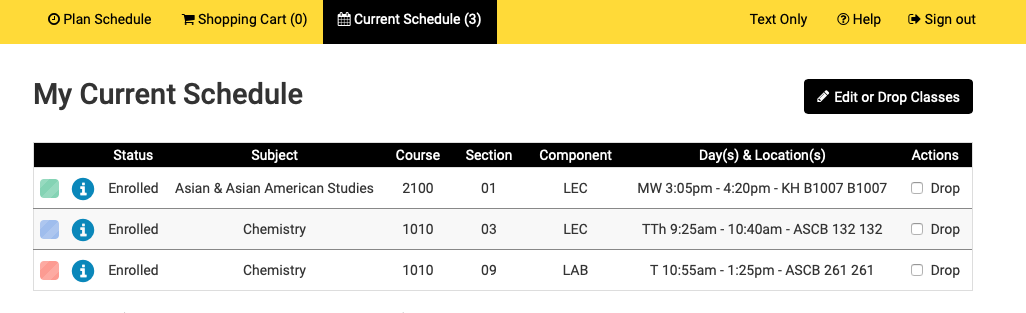
Confirm the courses show up in My Current Schedule.
Other Information
Notes regarding unit load and enrollment status
Undergraduate students:
- May enroll in up to 18 units per semester
- May waitlist up to 9 units at a time
- Waitlisted units are included in the overall term limit
- Full-time enrollment status requires enrollment in 12 units for the semester, however, 15 units is recommended for timely graduation
Graduate students:
- May enroll in up to 16 units per semester
- May waitlist up to 9 units at a time
- Waitlisted units are included in the overall term limit
- Graduate courses in the 5000 and 6000 number sequences are no longer weighted (x1.5) when calculating enrollment status (e.g. full-time, half-time, etc.)
- Full-time enrollment status requires enrollment in 8 units for the semester
Important Semester Dates & Deadlines
Browser compatibility and Mobile App
Supported desktop browsers for GET include the following:
- Mozilla Firefox (Mac/Win)
- Google Chrome (Mac/Win)
- Apple Safari (Mac)
Other browsers may not work as expected with GET. Also note that mobile browsers (Android, iOS on iPhones and iPads) may not display GET pages correctly. If you experience issues on these mobile platforms, please:
- Download the GETmobile app, the recommended mobile solution for GET.
- Try a different browser
- Use a Windows or Mac computer
Please contact the ITS Help Desk with any technical questions at 323-343-6170 or email at helpdesk@calstatela.edu or visit LIB PW Lobby.
About Waitlists
Slideshow: Using a Waitlist
Waitlist FAQ (for Students)
Many courses offered that have reached capacity will provide the opportunity to waitlist during registration.
What is a waitlist? A waitlist is a way you can add your name to a list for full classes during the enrollment process. If a seat becomes available, you are automatically enrolled. This service is available for many courses offered. Waitlists are not available for all courses. There are some limitations and conditions for waitlists. What follows are some common questions about waitlists.
What classes can I waitlist? Most undegraduate classes will have waitlists (see the limitations section below). Contact the department offering the course if you are not offered the waitlist option and believe you should.
When can I be added to a waitlist? Once a class is full, a student can add their name to a waitlist beginning on their appointment date up to two business days before the beginning of the term.
What happens after the waitlist period? The waitlist for a course will be turned off at 11:59 pm two business days before classes begin for the term. Students remaining on the waitlist after this period will not be enrolled through the waitlist process. At this point, instructors will determine who is added to the class.
What should I do after I successfully waitlist in GET? Before the start of the term be sure to watch your official Cal State LA email address (in the myCalStateLA portal) for notice that you have successfully enrolled. If you don't receive notification then you are probably not enrolled. In this case, after the term starts be sure to attend the first class meeting for the course you wish to add. At this first class you may be able to obtain a permit from the instructor to add the class.
I am a part-time student, can I waitlist? All appropriate fees must be paid before enrollment from waitlist can occur. If appropriate fees are not current, the student will remain on the waitlist, but no enrollment transaction can take place. Part-time students who want to go into full-time status must pay full-time fees beforehand.
Do waitlisted courses count towards enrollment? Waitlist courses are not counted as enrolled courses and cannot be counted towards financial aid or enrollment verification status.
What if I decide to not enroll in a course that I waitlisted? Students are responsible for dropping themselves from the waitlist. If a student is enrolled through waitlist and does not attend the course, a grade of WU will be given which is the same grade point penalty as a grade of F.
How do I drop from a waitlist? You can drop from a wait list through the Student Center just as you would drop from any other class.
How do I check the status of my waitlist position? You can check your waitlist position in the class schedule section of the Student Center. Waitlist position numbers begin with number one using the “first come, first served” concept.
Can students not on waitlist take a seat? If seats become available, the open seats will not be available to students that are not on the waitlist. Students can add directly if there are seats available and nobody is on the waitlist.
How do I know if I am enrolled through the waitlist process? You should check your class schedule daily. If you become enrolled through waitlist you will receive an e-mail. Note that you have the responsibility to ensure that your enrollment is correct and you have added/dropped classes by the published deadlines.
Is there a guarantee that I will be enrolled if I get placed on a waitlist? There is no guarantee you will be enrolled from a waitlist. Remember, it is first come, first served.
May I enroll and waitlist in different sections of the same course? Yes, you may waitlist for different sections of the same class. If you are already enrolled in one section of a class, but prefer another section you may choose to swap the enrolled section for the waitlisted section. You will only be dropped once successfully enrolled from the wait list. You cannot waitlist for or swap into classes that have a Related Class in common, such as labs that share a common lecture.
How do I know when new sections are added for a course I've waitlisted? Academic departments are encouraged to notify waitlisted students via e-mail when new sections are added. Students are encouraged to monitor their enrollment and periodically check to see if new sections have been added. It is the student's responsibility to access GET and swap the waitlisted section for a new open section.
Waitlist FAQ (for Faculty)
Please visit the Faculty GET page for Faculty-specific waitlist information.
Waitlist Limitations
Co-requisites - Classes that require co-requisites cannot be waitlisted.
Permitted Courses - Courses that require permission cannot be waitlisted. You need to go to the course's department to receive a permit.
Registration Holds (Negative Service Indicators) - If you have holds on your registration, you cannot waitlist.
Requisites - If you have not completed the required requisites for a course, you cannot waitlist.
Time Conflict – If you are enrolled in a class at the same time the waitlist course is being offered, you will not be able to waitlist the course.
Exceeding Units - You cannot enroll in a waitlisted class if it causes you to exceed the maximum units allowed.
Additional Sections - Yout cannot enroll in a waitlisted class if you are already enrolled in a different section of the same course.
9 Units Maximum - Student may waitlist up to nine units at a time depending on full/part-time payment status.
How to get on a Waitlist if a course is full
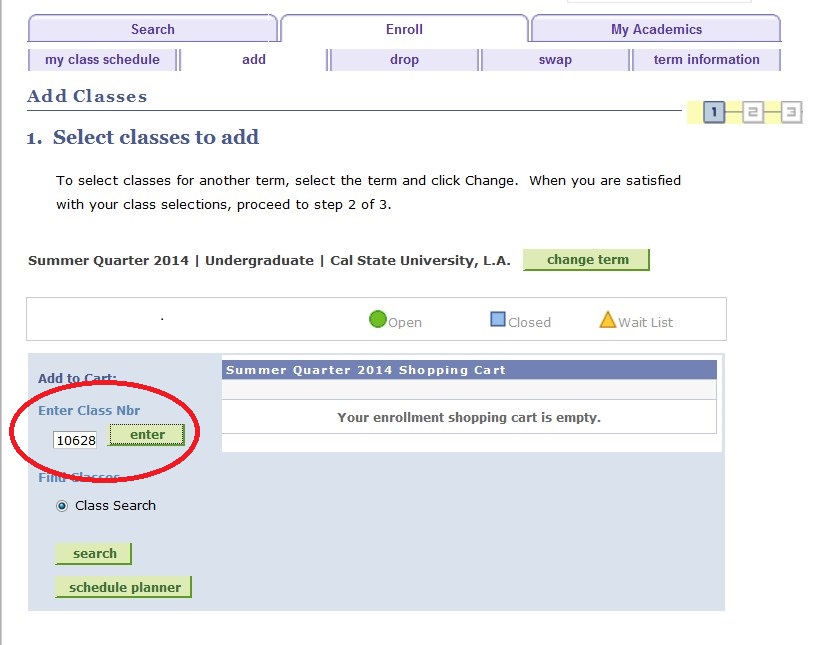
Example result: Waitlist Completed - Message reads: Class 10628 is full. You have been placed on the wait list in position number 1. 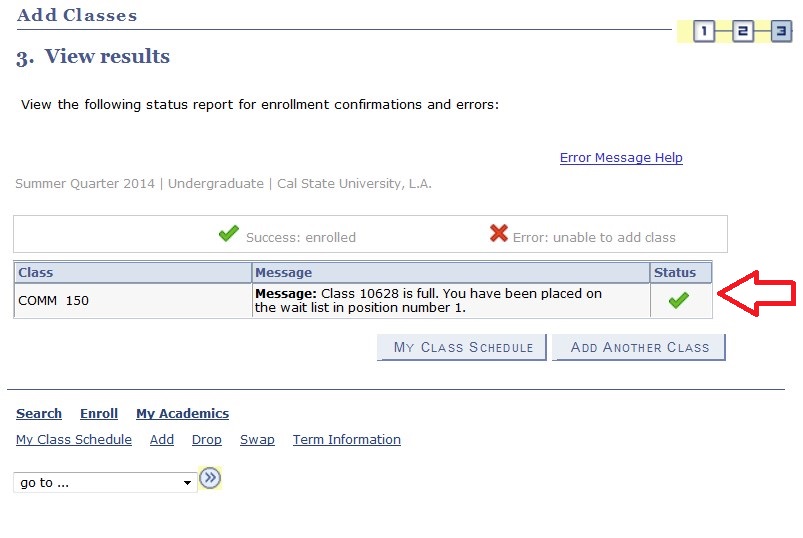
For help on waitlist, please contact the academic department offering the course for which you are trying to enroll or contact the GET Helpline at 323-343-7GET (7438).
- Enter Class Number (Nbr) and Click enter (or click search to search for a class number)
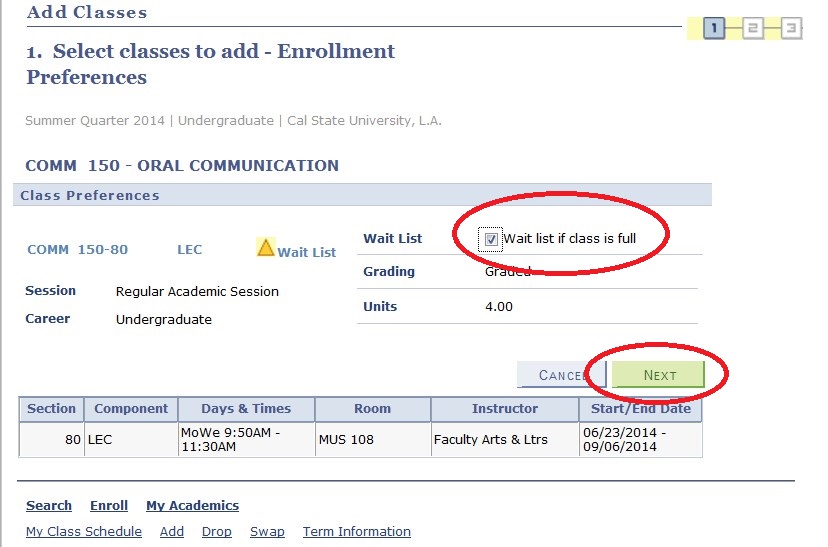
- Click the Waitlist Box and then click NEXT
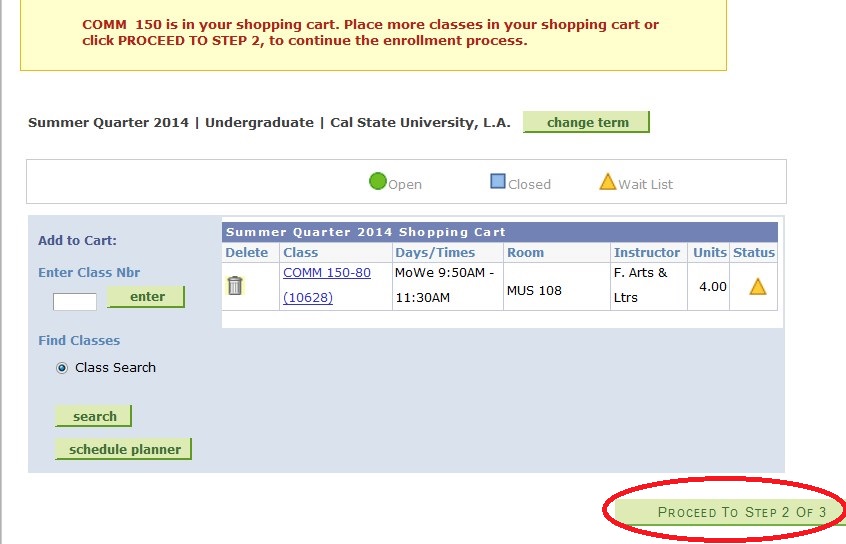
- Review, and if the correct course is displayed, click Proceed to Step 2. Note: You can delete the course from your shopping cart at this point -- just click the trash can icon. After you finish the wait list process you can drop the class like any other class.
- Click Finish Enrolling.
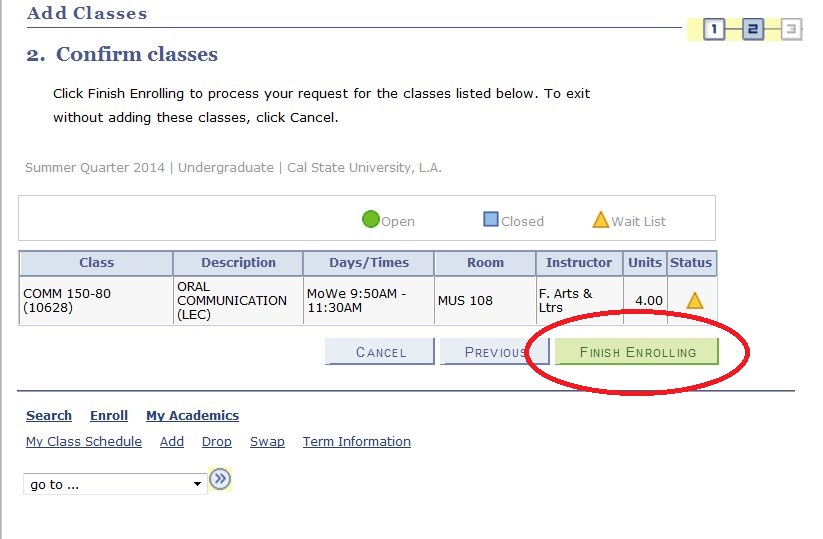
- After you successfully wait listed a course, the screenshot below is what your schedule will look like until the system enrolls you into the course.

Due to the Coronavirus (COVID-19) situation, we recommend using email to communicate with the GET Helpline if you cannot get through via telephone.
